
Java 9’s JShell can not only be used as a command line tool, furthermore you can harness its functionality in your own Java applications. Learn on how to harness the JShell by building a restful service around it.
The JShell is shipped with Java 9 and represents a read-eval-print loop, also known as REPL. By calling jshell from your shell, you can interact with Java in an interactive manner, similar to a common shell: You type in some instructions, hit enter and get the result immediately, without any files to be created, without any boilerplate code and without the hassle of compiling and then executing your code beforehand.
The service being described here merely servers demo purposes and may be extended by yourself in order to make a reliable and secure piece of software!
Getting started
To get up and running, clone the funcodes-restrepl repository from bitbucket’s git repository.
How do I get set up?
Using SSH, go as follows to get the Maven RestREPL project:
1
git clone git@bitbucket.org:funcodez/funcodes-restrepl.git
Using HTTPS, go accordingly as follows to get the Maven RestREPL project:
1
git clone https://bitbucket.org/funcodez/funcodes-restrepl.git
Then you can build a fat-jar and launch the application:
1
2
3
cd funcodes-restrepl
mvn clean install
java -jar target/funcodes-restrepl-0.0.1-SNAPSHOT.jar
Big fat executable bash script (optional)
This step is optional, though when running your application under Linux, the following will be your friend:
To build a big fat single executable
bashscript, take a look at thescriptify.shscript and thebuild.shscript respectively:
1
2
./toolbox/scriptify.sh
./target/restrepl-launcher-x.y.z.sh
The resulting restrepl-launcher-x.y.z.sh file is a big fat single executable bash script being launched via ./target/restrepl-launcher-x.y.z.sh.
Building and creating an executable bash script is done by calling
./toolbox/build.sh!
Starting RestREPL server
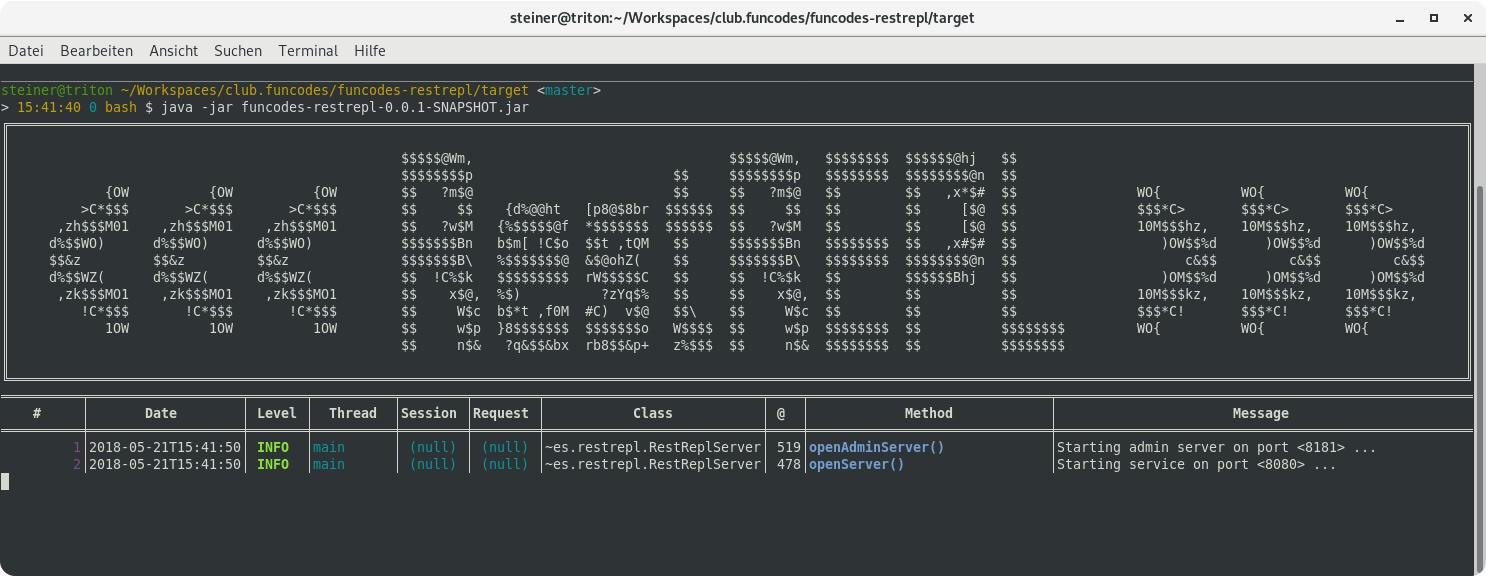
As described above, you may go with directly executing the JAR file by invoking java -jar target/funcodes-restrepl-0.0.1-SNAPSHOT.jar or, after some doings, you may also go with the big fat executable bash script like ./target/restrepl-launcher-x.y.z.sh to start the RestREPL server.
Either way you launch the RestREPL server, you will be greeted with the following console output:
Configuring the RestREPL server
You may go for any notation such as Java, TOML, XML, YAML or JSON for the application.config configuration file placed in a valid location:
1
2
3
4
5
6
7
8
9
port=8080
maxConnections=20
identity=webmaster
secret=encrypt:secret

[admin]
port=8081
identity=admin
secret=encrypt:secret
In the above configuration, the RestREPL server is running on port 8080 and its according administration interface on port 8081.
Shutdown the service
To shutdown the RestREPL server again, do a GET request on the admin’s interface at http://localhost:8081/shutdown URL and provide the Basic-Auth user name admin with the password secret. Going with curl, this would look as follows:
1
2
3
4
curl -XGET --user admin:secret http://localhost:8081/shutdown
# The HTTP response as of your curl call |-->
"Shutting down ... bye!"
# <--| The HTTP response as of your curl call
As of successful authentication, the service responds with "Shutting down ... bye!".
Don’t forget to start your
RestREPLserver again!
Open a JShell session
To open a fresh restful JShell session, call the RestREPL server by doing a POST request on the service’s interface at http://localhost:8080/restrepl/sessions and provide the Basic-Auth user name webmaster with the password secret. We also got to provide a Media-Type as we expect a meaningful response. Going with curl, this would look as follows:
1
2
3
4
5
6
curl -XPOST -H "Accept: application/json" --user webmaster:secret http://localhost:8080/repl/sessions
# The HTTP response as of your curl call |-->
{
   "sessionId": "PUcxmiUD"
}
# <--| The HTTP response as of your curl call
Hint: In this blog I use the command utility
json_ppto pretty-print theJSONresponse by piping thecurlresponse throughjson_pp(which I didn’t explicitly documented in the example calls).
We created a JShell session with the Session-ID “PUcxmiUD”. This Session-ID we now can use to invoke the JShell read-eval-print loop. We also can create a JShell session with a custom Session-ID “my_session”:
1
2
3
4
5
6
curl -XPOST -H "Content-Type: application/json" --user webmaster:secret http://localhost:8080/repl/sessions --data '{ "sessionId": "my_session" }'
# The HTTP response as of your curl call |-->
{
   "sessionId": "my_session"
}
# <--| The HTTP response as of your curl call
Extended JShell sessions
When creating a JShell session, we can also provide some additional attributes in the body of the POST request:
alias: Thealiasgives your session a human readable name, useful when providing a user interface.sessionId: You may explicitly provide asessionIdinstead of letting the service generate one for you.identity: In case you want to secure your session withBasic-Auth, use theidentityto provide a valid user name for authentication.secret: In case you want to secure your session withBasic-Auth, use thesecretto provide a valid user’s password for authentication.
You may just provide a valid subset of them above described attributes. Going with curl and using JSON to describe the attributes, creating an extended JShell session would look as follows:
1
2
3
4
5
6
curl -XPOST -H "Content-Type: application/json" --user webmaster:secret http://localhost:8080/repl/sessions --data '{ "sessionId": "my_secret_session", "alias": "Java Training 2", "identity": "foo", "secret": "bar" }'
# The HTTP response as of your curl call |-->
{
    "sessionId": "my_secret_session"
}
# <--| The HTTP response as of your curl call
As we provided the
Content-TypeHeader-Fieldand theAcceptHeader-Fieldis missing, theAcceptMedia-Typeis automatically inferenced by the service to be the same asContent-Type’sMedia-Type!
Listing the JShell sessions
We may retrieve a list of all currently opened JShell sessions by doing a GET request on the service’s interface at http://localhost:8080/restrepl/sessions. Going with curl, this would look as follows:
1
2
3
4
5
6
7
8
9
10
11
12
13
14
15
16
17
18
19
20
21
22
curl -XGET -H "Content-Type: application/json" --user webmaster:secret http://localhost:8080/repl/sessions
# The HTTP response as of your curl call |-->
{
   "sessions": [
      {
         "PUcxmiUD": {
            "alias": "PUcxmiUD"
         }
      },
      {
         "my_session": {
            "alias": "my_session"
         }
      },
      {
         "my_secret_session": {
            "alias": "Java Training 2"
         }
      }
   ]
}
# <--| The HTTP response as of your curl call
Doing a restful read-eval-print loop with your JShell session
For the sake of simplicity, doing the restful read-eval-print loop, we go for the initially created “my_session” session ID and with no Basic-Auth required. The read-eval-print loop is initiated by doing a PUT request on the service’s interface at http://localhost:8080/restrepl/sessions/{sessionId} where sessionId stands for the ID of the session in question (in our case “my_session”). Going with curl, this would look as follows:
1
2
3
4
5
6
7
8
9
10
11
12
13
14
15
16
17
curl -XPUT -H "Content-Type: application/json" http://localhost:8080/repl/sessions/my_session --data '{ "eval": "System.out.println( \"Hello world!\")" }'
# The HTTP response as of your curl call |-->
{
   "out": "Hello world!\n",
   "err": null,
   "result": [
      {
         "isSignatureChange": "true",
         "exception": null,
         "value": "",
         "causeSnippet": null,
         "status": "VALID",
         "previousStatus": "NONEXISTENT"
      }
   ]
}
# <--| The HTTP response as of your curl call
Above we told our JShell session to execute the code System.out.println( "Hello world!"). The result contains the System.out print stream’s content in the attribute out and the System.err print stream’s content in the attribute err. In your call you might also provide content for the System.in input stream:
1
2
3
4
5
6
7
8
9
10
11
12
13
14
15
16
17
curl -XPUT -H "Content-Type: application/json" http://localhost:8080/repl/sessions/my_session --data '{ "in": "Hello universe!\n", "eval": "System.out.println( new java.util.Scanner( System.in ).nextLine() )" }'
# The HTTP response as of your curl call |-->
{
   "err": null,
   "result": [
      {
         "exception": null,
         "causeSnippet": null,
         "value": "",
         "isSignatureChange": "true",
         "status": "VALID",
         "previousStatus": "NONEXISTENT"
      }
   ],
   "out": "Hello universe!\n"
}
# <--| The HTTP response as of your curl call
In the body we provide an attribute in which’s value is fed into the JShell session’s input stream. Then we use an instance of the Scanner class, which reads the next available line from the input stream. If you don’t put the newline “\n” at the end of your in attribute, then your rest request will hang till you fed some newline “\n” within the in attribute in an according succeeding request.
Invalidating the JShell sessions
Closing a JShell session is straight forward. Just do a DELETE on the service’s interface at http://localhost:8080/restrepl/sessions/{sessionId} where sessionId stands for the ID of the session in question (in our case “my_session”). Going with curl, this would look as follows:
1
2
3
4
5
6
curl -XDELETE -H "Content-Type: application/json" http://localhost:8080/repl/sessions/my_session
# The HTTP response as of your curl call |-->
{
    "invalidatedId": "my_session"
}
# <--| The HTTP response as of your curl call
The source code
The RestREPL server fits into a single Java class file. See here for the source code and here for the funcodes-restrepl git repository.
Further reading
Please take a look at the blog post Bare-Metal REST with just a few lines of code and the article refcodes-rest on the RESTful server which the RestREPL server makes use of. Also see the blog posts Dead simple Java application configuration, Automatically obfuscate your Java application’s configuration and All-in-one Java configuration properties at hand as well as refcodes-properties on how configuration aspects are handled by the RestREPL server.